Page Contents
- Ghana GRA E‑VAT Integration – Support / Help Guide (Output Books)
- Prerequisites (GRA Requirements)
- Step 1: Enable E‑Invoice (E‑VAT) Module
- Step 2: Configure GRA E‑VAT API Settings
- Step 3: Enter GRA E‑VAT API Credentials
- Step 4 : Transmitting Invoice to GRA E‑VAT System
- Step 5: Submit Invoice to GRA
- Step 6: GRA E‑VAT Acknowledgement & Response Data
- Step 7 : QR Code (GRA E‑VAT Verification)
- Compliance Notes & Troubleshooting
- Support Assistance
Ghana GRA E‑VAT Integration – Support / Help Guide (Output Books)
This support document explains how to configure and use Ghana Revenue Authority (GRA) Electronic Value Added Tax (E‑VAT) integration in Output Books. The steps below follow GRA‑aligned terminology for accurate compliance and reporting.
Prerequisites (GRA Requirements)
Before enabling E‑VAT integration, ensure you have received the following credentials from GRA or an authorised E‑VAT service provider:
- Company Reference (Taxpayer system reference)
- Security Key (Authentication key issued by GRA)
- Operational Environment:
- Staging (Test Environment) – For validation and testing
- Production (Live Environment) – For statutory E‑VAT reporting
IMPORTANT: These credentials are mandatory for transmitting invoices to the GRA E‑VAT system.
Step 1: Enable E‑Invoice (E‑VAT) Module
- Navigate to Settings > Modules
- Enable E‑Invoice
- Click Save to apply changes

Step 2: Configure GRA E‑VAT API Settings
- Remain on the Settings > Modules page
- Click the Config link next to the E‑Invoice module

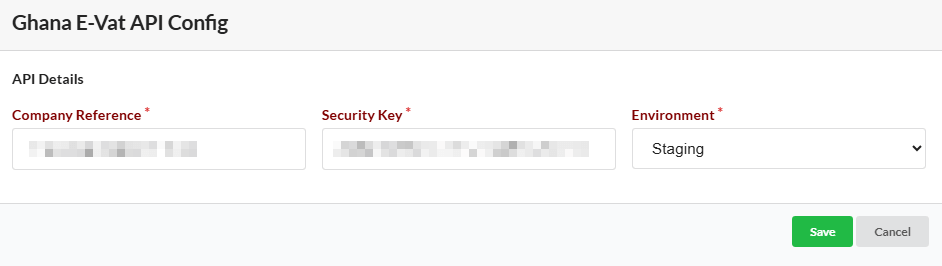
Step 3: Enter GRA E‑VAT API Credentials
In the Ghana GRA E‑VAT API Configuration window, enter the following information exactly as provided by GRA:
- Company Reference – GRA‑issued taxpayer reference
- Security Key – GRA authentication key
- Environment:
- Staging – GRA test system (recommended for initial setup)
- Production – GRA live system (used for statutory invoice submission)
- Click Save to complete the configuration.
Step 4 : Transmitting Invoice to GRA E‑VAT System
- Go to Sales > Invoice
- Identify the invoice to be reported to GRA
- Click the E‑Invoice (e‑icon) corresponding to the invoice
![]()
![]()
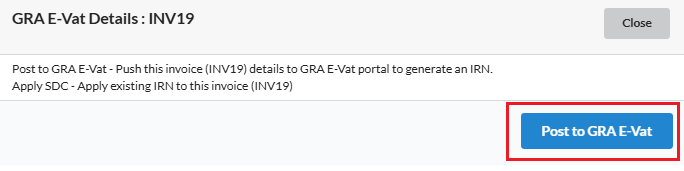
Step 5: Submit Invoice to GRA
- In the E‑Invoice submission pop‑up, click Post to GRA E‑VAT
- Output Books transmits the invoice data to the GRA E‑VAT platform
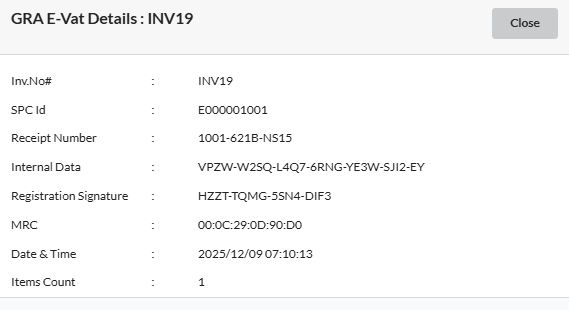
Step 6: GRA E‑VAT Acknowledgement & Response Data
Once the submission is successful, GRA sends an E-VAT acknowledgement. Output Books automatically records this, changes the e-icon to Green, and displays the following GRA-generated information when clicked.
- Invoice Number – Example:
INV19 - SPC ID (Sales Point Code) – Example:
E000001001 - Fiscal Receipt Number – Example:
1001‑621B‑NS15 - Internal Data – GRA encrypted internal reference
- Registration Signature – GRA digital registration signature
- MRC (Machine Registration Code) – Registered device identifier
- Date & Time – GRA confirmation timestamp
- Items Count – Number of line items transmitted
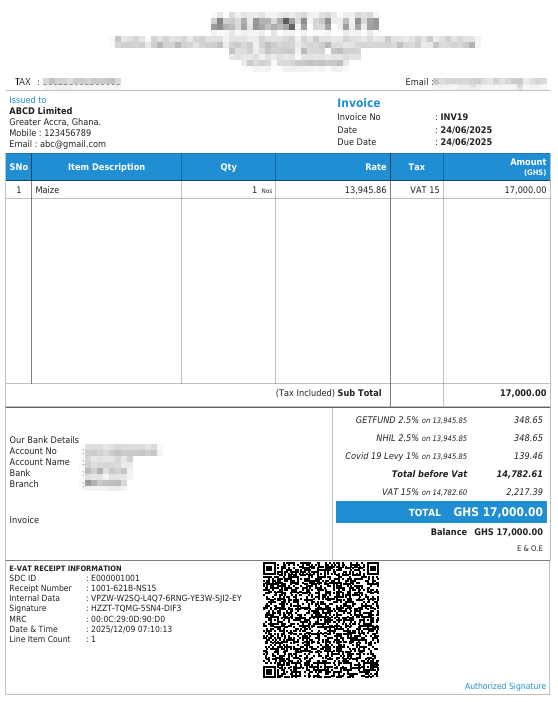
These details are mandatorily printed on the tax invoice as per GRA E‑VAT requirements.
Step 7 : QR Code (GRA E‑VAT Verification)
- After successful GRA validation
- A GRA E‑VAT QR Code is automatically generated
- The QR Code appears on the printed tax invoice
- It enables real‑time invoice verification by GRA officers and customers
Compliance Notes & Troubleshooting
- Always validate invoices in the Staging (Test) Environment before moving to Production
- Only invoices successfully acknowledged by GRA will contain E‑VAT details and QR code
- Ensure continuous internet connectivity during invoice transmission
- In case of submission failure:
- Verify Company Reference and Security Key
- Confirm correct Environment selection
- Retry submission after correction
Support Assistance
If issues persist, contact Output Books Support with:
- Invoice Number
- Error message or response code (if any)

