Page Contents
1. Import Items in bulk
Importing items in bulk through an Excel file streamlines the process of adding or updating large product inventories. This method reduces manual entry, ensures data consistency, and saves time. By following the system’s format and using a predefined template, you can efficiently import key details like SKUs, pricing, batch numbers, and other attributes, keeping your inventory accurate and up-to-date.
Steps to Import Items in Output Books:

- Go to Manage > Items.
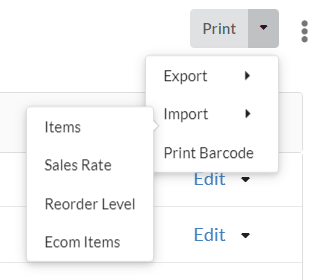
- Click the dropdown next to the Print button.
- Choose Import > Items.
- Download the Sample Excel template from the pop-up.
- Fill in the item details (e.g., Name, SKU, Price).
- Upload the file using Choose File.
- Click Import to finish
Download the Sample CSV/EXCEL file

Below is a description of the fields to help you insert records correctly:
Note : Do not alter the file’s column name. Field name are case sensitive.
| Fields | Description | Default Value |
| name (*) | Name of the Item/Service. It must be unique. | Item name (mandatory field) |
| type | Value: G / S / R / Y / T; G – Goods; S – Service; R – Returnable Goods; Y – Assembly; T – Storage | G |
| SKU | Unique number or code used to track and manage the item in inventory | NIL |
| HS | HSN Code / SAC Code of the Item/Service | NIL |
| saleRate | Selling Price of the Item/Service | NIL |
| purchaseRate | Purchase Rate / Cost Rate of the Item/Service | NIL |
| uom | Unit of Measure. Format : NOS / PCS / KGS / BOX / BAG | NOS |
| isSale | Value: 0 or 1. 0 indicates that the item is not for sale (e.g., raw materials). | 1 |
| isPurchase | Value: 0 or 1. 0 indicates that the item is not for purchase (e.g., manufacturing items). | 1 |
| saleAccount | Account name for sales transactions. | Sales |
| purchaseAccount | Account name for purchase transactions. | Purchase |
| isInventory | Value: 0 or 1. Set to 1 if you want to track inventory for this item. | 1 |
| itc | Value: 0 or 1. Set to 1 if you claim Input Tax Credit for this item upon purchase. | 1 |
| taxId | Tax Rate of the item. Format: GST 12% or VAT 5%. If you leave this field as empty, default Tax rate given in Company Settings gets saved. | NIL |
| saleDiscount | Discount Percentage Value | NIL |
| saleDesc | Description of the item displayed in Sales transactions | NIL |
| purchaseDesc | Description of the item displayed in Purchase transactions | NIL |
| isActive | Value: 0 or 1. Assign 1 if the item is currently active | 1 |
| OpeningQty | Opening Quantity: Initial quantity of the item available at the start of the accounting period | NIL |
| OpeningRate | Purchase/cost rate per unit of the item to calculate opening stock value. | NIL |
| category | Category of the item | NIL |
| mrp | Maximum Retail Price of the item | NIL |
| printName | Item/Service Name to be printed | NIL |
| catBrand | Brand name of the item | NIL |
| isOboLevel | Value: 0 or 1. Assign 0 if you want to set Manual reorder level for items | 1 |
| stkLevel | ReOrder Quantity level | NIL |
2. Import Items with relative units
In Output Books, items can be managed using a Base Unit and two types of secondary units: Relative Unit and Pack Unit.
- Relative Unit: Represents a different packaging of the base unit.
- Example: Base Unit: Tablets (TAB); Relative Unit: Strip (STRP).
- Conversion Factor: 1 STRP = 10 TAB (1 strip contains 10 tablets).
- Pack Unit: Pre-defined smaller or fractional quantities of the base unit.
- Example: Base Unit: Kilograms (KGS); Pack Units: 250 gms, 500 gms.
- Conversion Factors: 250 gms = 0.25 KGS, 500 gms = 0.5 KGS.
Fields Description for Importing Relative Units:
| Field | Description | Relative Unit Example (1 STRP = 10 TAB) | Pack Unit Example (250 GMS = 0.25 KGS 500 GMS = 0.5 KGS) |
| reltype | Type of the secondary unit (P – Pack Unit, R – Relative Unit). | R | P~P |
| relunitpurchaseRate | Purchase price of the item for the relative unit. | Purchase rate of 1 strip | Purchase rate of 250 GMS~ Purchase rate of 500 GMS |
| relunitsaleRate | Selling price of the item for the relative unit. | Sale rate of 1 strip | Sale rate of 250 GMS~ Sale rate of 500 GMS |
| convFactor | Conversion factor between the base and relative unit. | 10 | 0.25~0.5 |
| relUnitName | Name of the relative unit (e.g., BAG, BOX, PAC, STRP). | STRP | 250 GMS~500 GMS |
3. Points to remember when importing items
- Do not alter the file’s columns.
- Ensure that the file format is the same as the downloaded template. (*.xls or *.csv)
- Double-check data before importing to avoid errors.
- Ensure all mandatory fields (e.g., name, type) are filled in. Missing or incorrect data may result in errors during the import process.
- Ensure SKUs and Item names are unique.
- Before importing, verify that the items are not already in the system. If already exists, it will update with the existing one.
- If you have a large number of items, consider breaking the file into smaller batches to minimize the risk of import errors.
- Before importing, create a backup of your existing data to ensure no critical information is lost in case of an error.
- If you’re importing items for the first time, try importing a small set of data to verify everything works smoothly before importing in bulk.
- Ensure that Unit is already created in Settings > Units
- If you are using multiple units, ensure they are correctly mapped and aligned with the items being imported.
- Ensure consistent capitalization for names, categories, and descriptions to maintain uniformity across all items.
4. Import Opening Stock with Attributes
Importing opening stock with attributes helps set initial stock levels along with key details like batch numbers and expiry dates. Using an Excel file, you can efficiently update inventory in bulk, ensuring accurate records and seamless operations from the start.
4.1. Steps to import Opening Stock with attributes
- Go to Accounting > Opening Balance.
- Click Opening Stock tab.
- Click Import CSV button

4.2. Fill in and Import Stock
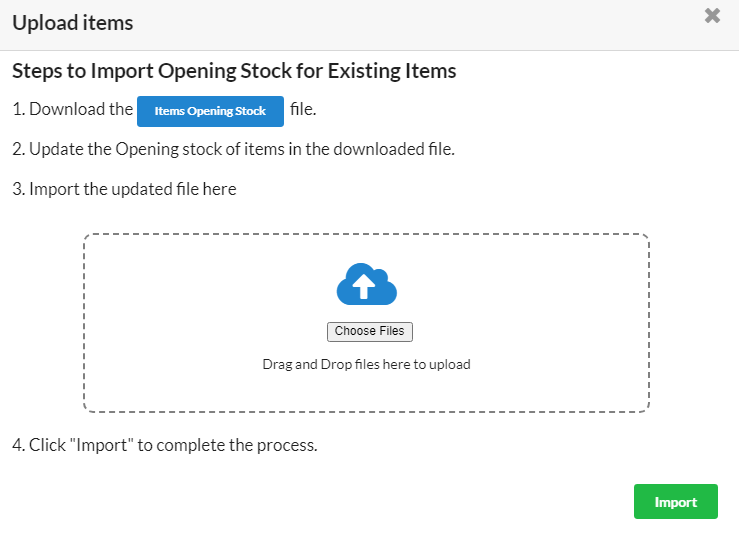
- Download the Item Opening Stock file from the pop-up.
- Add the necessary details in the downloaded file.
- Ensure column names match the item master attribute names in Manage > Items > Attributes.
- Import the file using Choose File and click Import.

4.3. Points to Remember When Importing Items with attributes
- Ensure column names match the system’s attribute names. Manage > Items > Attributes
- Manufacturing and expiry dates must follow the correct format (YYYY/MM/DD).
- Ensure manufacturer names are consistently spelled.
- Items with different batch numbers, expiry dates, and manufacturers might need to be recorded as separate inventory entries.
- For regulated industries, ensure batch, manufacturing, and expiry dates are filled correctly.
- Test with a small sample before large imports to avoid errors.
Sample Excel

5. Import Sale Rate
If you want to update sale rate as bulk, you can export the existing items, update sale rate and import the same file as follows
- Go to Manage > Items.
- Click the dropdown next to the Print button.
- Choose Import > Sale Rate.
- Download the Item Sale Rate file from the pop-up.
- Update the Sale Rate in the downloaded file.
- Then import the same file using Choose File.
- Click Import to finish
Note: Do not alter the file’s columns.
6. Import Reorder level
Importing reorder levels helps automate inventory management by setting stock thresholds. When an item’s stock falls below the set level, the system triggers a restock alert. Bulk importing these levels via Excel streamlines the process, ensuring optimal stock levels and preventing shortages.
- Go to Manage > Items.
- Click the dropdown next to the Print button.
- Choose Import > Reorder Level.
- Download the Items Reorder level file from the pop-up.
- Update the Reorder level in the downloaded file.
- Then import the same file using Choose File.
- Click Import to finish
Note: Do not alter the file’s columns.